Pages

Monday 25 April 2011

Box card called Love

I love learning new techniques and my most favourite blog is keeping me supplied with loads to try.  If you haven't taken a look yet, head on over to Mariannes papirverden.  She is so talented.


There are tutorials for most of her cards and if she hasn't made the tutorial herself, she links to one that you can use.  I am learning so much :o)


This one was made from two complete A4 sheets of paper (inner and outer shell) plus most of an A4 sheet of silver mirri board and most of an A4 sheet of thin white card.


Die Cut Dreams and Totally Paper Crafts, both asked us to make wedding cards for this weeks challenges and Fab n Funky said "Here comes the bride".  So guess what my theme is :o)


It's actually quite simple to make, but it does have that wow factor.  I have a heart shaped charm dangling from a chain attached to the front, center crease.


I like the little details that I see on cards, so I have added some silver and white ribbon to tie this card closed.


I will also be entering this card for this weeks challenge at JUGS who asked us to use a 3D template with a spring or summer theme.  I've gone with a spring wedding theme and I used the template from the tutorial to make this and I think you will agree that it is definitely a 3D project :o)

Friday 22 April 2011

Heart of my rose

I went shopping this week and found some wooden, paint you own heart shaped boxes.  First thing I did was throw everything away except for the heart shaped box.


The pink paper I used is from HOTP and I have had it for years.  I have distressed the edges a bit with an emery board and my Tim Holtz paper distresser. The bow is made from crispy lace and then I added loads of roses and chrysanths.  The ivory flowers have been slightly tinted using tattered rose and worn lip stick distress inks and I have frosted all of the roses by lightly brushing them with ivory pearlescent ink and dusting with iridescent embossing powder.  I finished off with some glitter glue for a bit of added sparkle. (That seems to be happening a lot lately).


 The large pearls came from a broken bracelet and I have added loads of mini pearls (flat backed) to finish.


I have added lace and ribbon to decorate the sides plus a single bow for detail.


I am entering my heart shaped box for the following challenges and then I am off out to buy more boxes :o)

CRAFT Challenge - Flowers
Everybody Art - Pearls

Saturday 16 April 2011

Chocolate Orange

If you caught my post yesterday, you will know that I am currently experimenting with my distress inks.  I've been eyeing up a few demos on timholtz.com to get some new ideas and I am starting to get a bit braver with trying things out.


Starting with a sheet of white paper I dabbed on Spiced marmalade and sprayed with water, did the same again with Tea dye and then finished off with Vintage photo.  I stamped the floral flourishes in Vintage photo and then embossed with some gold embossing power.  Now I don't have any distress embossing powder (definitely on my wish list) but I have attempted to get the same effect  by brushing some of the embossing power off before heating.

I loved the shimmer effect I got yesterday using the iridescent embossing powder, so I have done the same again (lightly sprinkle over some dabbed on distress ink and then heat).  It gives the paper a slightly rough feel and you can only see the glimmer when the card is facing a certain way, but I think it is worth it..

The colour scheme for this card came from the photo inspiration challenge at Paperplay challenges.  I don't know why, but chocolate and orange were the first things I thought of, so I ran with it.  That fit in very nicely with the chocolate challenge at Moving along with the times and the design came from the sketch at Everybody art.

If anyone has any comments tips or ideas for how I can improve my technique with distress ink, they are most welcome.  I love learning new things and blogging is a great way to do this xx

Friday 15 April 2011

Evolution

I've called this one Evolution, because I started off with a piece of white card and four distress ink pads and waited to see what evolved :o)


I started by covering my white card in Mustard Seed distress ink and then went over that, in parts, with Dried Marigold.  I then finished off with a lot of Spiced Marmalade and a little Fired Brick around the edges.  The Dots and Best wishes were stamped using Fired brick and then I dusted the whole thing with iridescent embossing powder.  Now I never got the hang of embossing and this is the first time I have tried using the powder like this (the pots have been in the drawer for years), but I love the shiny effect it has given.


 The die cut was coloured using Mustard Seed, Spiced Marmalade and a little Fired Brick.  I then stamped with fired brick and played with the embossing powder again.  I have seen fake stitching on other peoples card and love the way that it looks so I have used my pokey tool (I don't know the real name for it)  to make  the holes.

I loved making this butterfly.  It was a white die cut to begin with, so I started with Dried marigold dabbed on to both sides, which I sprayed with a little water and dried using my heat gun.  I use make up sponges with my distress inks as I don't have the proper tool yet.  I did the same with a layer of Fired brick and finished with a little Mustard seed.  I have again stamped with Fired brick.  I did the same with my flower too.


I'm not entirely sure why I did what I did with the ribbon, but it seemed right at the time :O).  I love 3D elements on a card and get them in when ever I can.  I couldn't resist adding the buttons.

I will be entering this card for the challenges at My Time To Craft - On the spot and Papertake Weekly - Truely dimentional

Sunday 10 April 2011

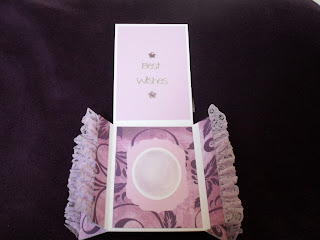
Ruffled

Every now and again I go blog hopping to get some fresh ideas and learn new techniques.  One of the best ones that I have come across lately is this one Mariannes.  Her stuff is gorgeous.  I'm still trying to work out how she did half of it.  She has great tutorials on her blog and I have followed this one Magic Card.


This is the front.  I have kept it fairly simple because I used lace and was worried that there would be too much going on.


This is the card open.
 

Side View


Top View


Back View


I am entering this card for the following challenges:
Allsorts Challenge Blog - Anything but a square
Papertake Weekly - Any thing goes (I also used a new technique)
Penny Black - Say it with flowers

Saturday 9 April 2011

Feathered

Quick make time for me.

I love doing challenges.  They keep the creative juices flowing and the design team makes are amazing.  I really enjoy trying to work out how they did some if the things in their projects.


This card was first inspired by this weeks challenge over at Secret Crafters Saturday Challenge.   They asked for our feathered friends.  That gave me the perfect excuse to use my new feathers.  Paperplay Challenges weekly and CRAFT Challenge asked for Animals/critters galore, respectively so I used my new Pink petticoat stamps (I used my worn lipstick ink pad for this).

The colour scheme came from this weeks challenge at One Stop Craft Challenge who asked for monochrome.  Well my feathers are baby pink so I went with pink and white.  I have highlighted a few areas on the bird and created a border using some iridescent glitter glue and added a few gems for some added bling.

Sunday 3 April 2011

Flutterbys

I just had to fit at least one quick card in today.  The theme of this one came from SCSC who asked us to use butterflies.  The vellum is covered in them and I have added two Anitas dimensions butterflies to give it a bit of wow factor.  


I have used silver peel off trim around the outer edge of the vellum and edged the inner piece with silver leaf pen.  I did use invisi dots on the vellum, but I also used brads just to be sure that the front wouldn't fall off.


Moving Along with the times asked us for more than one fold which is where the idea for the shape of the card came from.  Bizzy Becs Creatalicious Challenges asked us for two tone so that was the inspiration for the colour scheme.

Saturday 2 April 2011

Quilted Flowers

I haven't made an aperture card in ages, so I thought I would give it a go :0)  I started this one by folding a white sheet of A4 card in half and then trimming one inch from the front.  I added a strip of lace using DS tape and then covered the front with some card that I have had in my stash for years.  This one  is called Tasty cranberry by Memories complete.  I then used my nesties to cut the aperture and make the brown frame.


I used a piece of cream textured card stock inside the card and stamped along the edge using vintage photo distress ink.  I very rarely stamp in black any more as I find that browns can often give a softer finish.  Some times only black will do though :o)  I edged my stamped image with worn lipstick distress ink and then added lace. Lining your image up with your aperture is easy when you know how.  I line mine up in the aperture itself  and then close the card.     


Flowers next.  I'm still working on using multiple flowers on cards.  I think I am getting the knack of it now.  I added a bit of glitter glue to the tips of the flowers and to the flowers that I stamped on the edge for a bit of extra glitz.  The stamps that I have used came free with a magazine that I bought recently.


The sketch for this card came from this weeks challenge over at Card Patterns and I will also be entering this card for the challenge over at Allsorts Challenge Blog, who asked us to use flowers.
Related Posts Plugin for WordPress, Blogger...